Building a Web Server with the Free Tier
Now that you have your Free Tier account, it is time to have some fun and learn a lot in the process. In this section, you will build a fully functional web server in AWS by following some simple steps. You will use EC2 in this lab to create an Amazon Linux instance.
Note
Amazon is now naming its Linux instances after the calendar year, so be sure to choose the current image when you are stepping through this lab.
Lab: Building a Web Server with the Free Tier
Follow these steps to build a free web server using AWS EC2:
Step 1. Log in to the AWS Management Console using the root account you created in the previous lab. While you would not ordinarily use the root account for such a task, you will use this account here. In the next chapter, you will create a “standard” admin account for future work in AWS. Search the available AWS services for EC2 and select the link to enter the EC2 Dashboard.
Step 2. Click the Launch Instance button to create a new EC2 instance for your new web server.
Step 3. On the Launch an Instance page that appears, provide a name for your web server in the Name field. In the Application and OS Images (Amazon Machine Image) area, ensure that Amazon Linux is selected from the Quick Start tab. Notice that this Amazon Machine Image (AMI) is marked “Free Tier eligible,” as shown in Figure 6-4.

Figure 6-4 The Launch an Instance Page
Step 4. In the Instance Type area, select the hardware configuration of your instance. Notice that the t2.micro type has been selected for you, and this instance type is marked “Free Tier eligible.” Figure 6-5 shows this step.
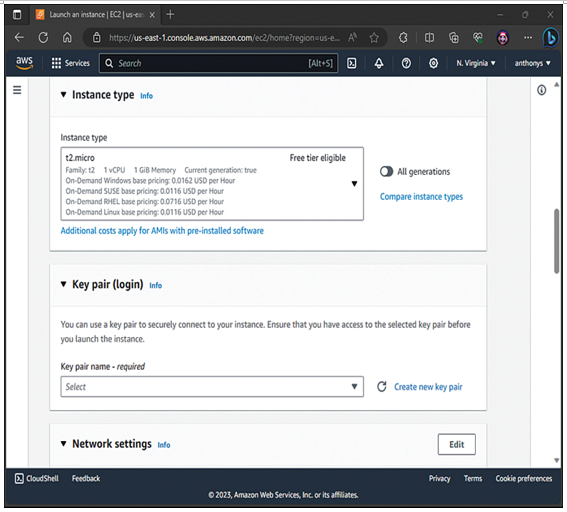
Figure 6-5 Choosing an Instance Type
Step 5. In the Key Pair (Login) area, click the Create a New Key Pair link. Provide a Key Pair Name and leave the defaults selected for Key Pair Type and the Private Key File Format. Click the Create Key Pair button.
Step 6. In the lower right of the Launch an Instance page, click the Launch Instance button.
Step 7. On the Next Steps page, click the View All Instances button. You should see your EC2 instance listed on this page. Notice that the instance state is running, as shown in Figure 6-6.
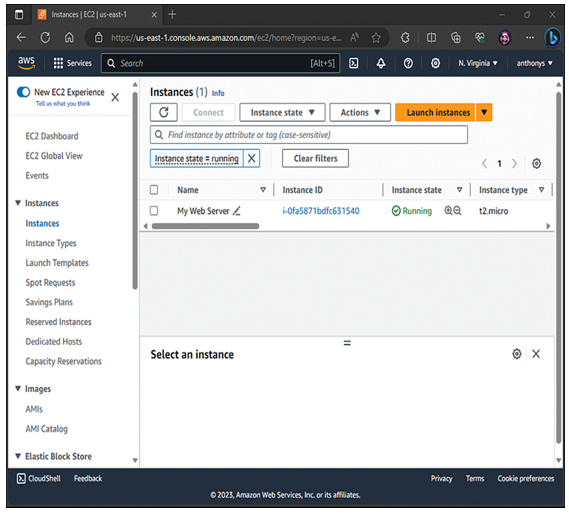
Figure 6-6 Your Running EC2 Instance
Step 8. Check the box to the left of your EC2 instance to select it. Then click the Connect button above your instance to access the Connect to Instance page. Select the SSH Client tab. Both modern Windows and Mac systems ship with enabled SSH clients. On a Windows system, launch a Command Prompt, and on a Mac, launch a Terminal session and follow the instructions to make an SSH session with your EC2 instance.