Building workflow rules
If you are on your path to become an advanced administrator, I assume you are already familiar workflows.
As a quick reminder, workflows are the oldest tool available on the Salesforce platform to run automations in an organization.
This feature is a so-called if/then statement tool, which means that if a condition is evaluated, then an action is performed, just like programmers code every day; for example, if an opportunity has an amount greater then $10 million, then send an email to the CEO, or if a case is not closed within two days, then set the Priority field to High—we could make list of examples.
As an example, a statement can be if a new lead is created, then a task has to be assigned to the record owner to start a sales call; it’s easy to identify the conditional part (a lead is created) and the action part (task assignment).
Since the birth of the Lightning Process Builder automation tool, it is suggested to use it in place of workflows.
But because workflows were introduced many years ago, it is more than likely that your organization will contain workflow automations, so it is mandatory to understand how they work and what their pros and cons are.
We generally talk about workflows, but they are actually composed of two parts:
- Workflow rule: This is the actual workflow identified by a criterion on a given record that should trigger actions.
- Workflow actions: These are the actions that are performed if a criteria is matched; they can be immediate actions (for example, create a task when the case is closed) or time-dependent actions (for example, sending an email on the contact’s birthday).
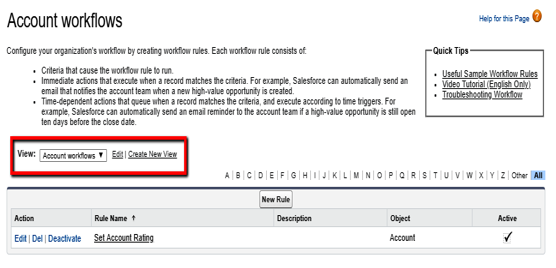
To create a new workflow rule, click on Setup | Process Automation | Workflow Rules; we already created a workflow rule called Set Account Rating in Chapter 2, Auditing and Monitoring, when we talked about debug logs, so you should already have a configured workflow rule on your organization. The following screenshot shows a list of current workflows in your org:

Workflow rules list
Especially when our organization is full of rules across diverse objects, creating a new list view can be more than helpful (in the previous screenshot, the Account workflows view was chosen).
When we create a new workflow rule, after object selection, you can select the evaluation criteria, which are the conditions under which the rule is evaluated regarding record creation/update. The available values are as follows:
- Created: The rule is evaluated only when a record is created, which means the record update is ignored. This kind of evaluation criteria guarantees that the workflow rule is triggered only once per record.
- Created and every time it’s edited: This evaluation type runs the workflow every time the record is created and updated as long as it meets the rule conditions. This means that if you update the record without changing any field (for example, you edit and save the record without changing any field on the record layout), the workflow executes every time (if the rule matches). With this configuration, no time-dependent action can be related.
- Created and any time it’s edited to subsequently meet criteria: This is the default evaluation criteria, and it is executed when the record is created or when it’s updated, but its field values go from not meeting criteria conditions to meeting them. This time the rule can run multiple times but not if an update is done to fields unrelated to the rule criteria. As an example, if the rule criteria is based on the Lead Status field to equal Open – Not Contacted, when the record is created with this value the rule runs. If we change the value of Working – Contacted the rule doesn’t fire, but if we change the value back to Open – Not contacted the rule fires again.
Along with evaluation criteria type, we can choose the actual rule criteria, which can be a simple field-operator-value list with an and/or logic or a formula that should be evaluated to true; use the second format if you need complex logic and access to related objects (for example, accessing Account fields from contact objects or record type related logic).
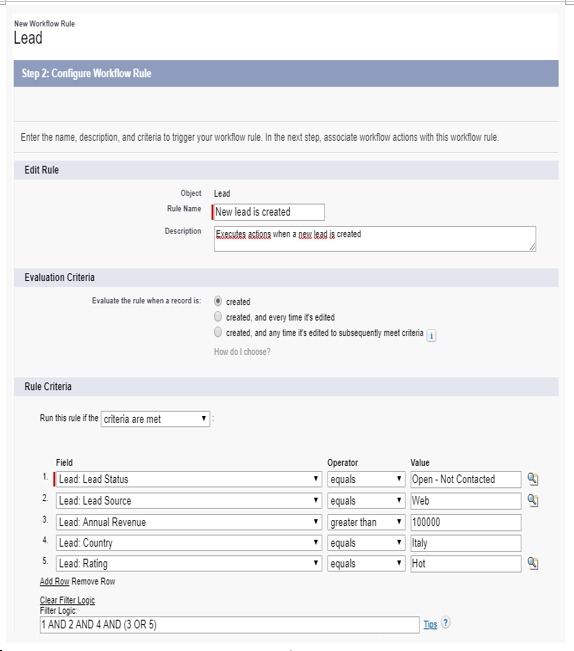
The following screenshot shows a simple lead-based workflow rule configuration:

Example of a lead workflow rule with simple criteria conditions
In this example, the rule triggers the lead object when it is created and evaluates to the following criteria:
- Lead: Lead Status is Open – Not connected.
- Lead: Lead Source is Web.
- Lead: Country is Italy.
- Lead: Annual Revenue is greater than 100000 or its Rating is Hot.
You can add up to 25 filter criteria with up to 255 characters each.
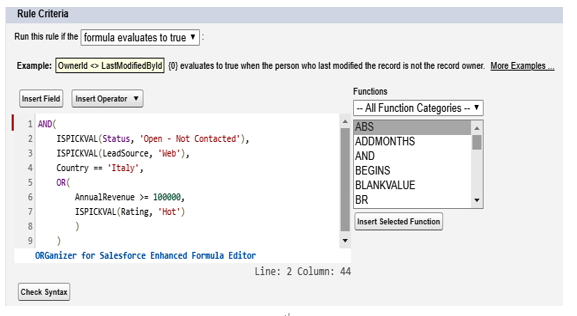
Using the formula criteria, this should have been written as follows:

Example of formula criteria for workflow rules
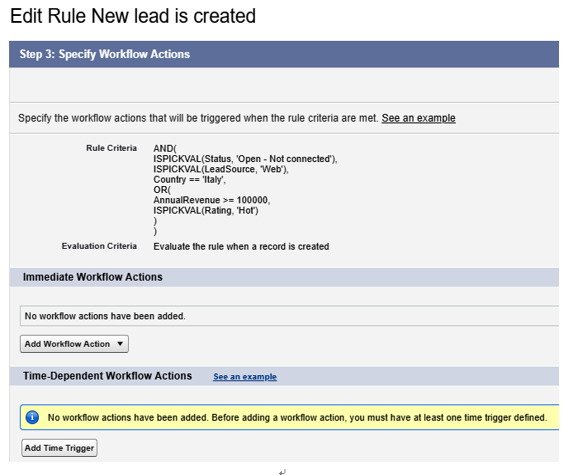
Once you click the Save and Next button, the workflow is saved (though inactive) and you are required to add actions (we can add existing actions or create new ones):

Action selection on workflow creation
As we’ve said, we can now add immediate actions (that is, actions executed in the same context as the record creation event) or time-dependent actions (that is, based on some time-dependent condition, which we’ll discover later), but before adding actions, let’s look at the kind of actions we can add to a workflow rule.
