Creating an approval process
To begin creating a new approval process, go to Setup | Process Automation | Approval Processes, select the object type (Opportunity), click the Create New Approval Process button, and select User Standard Setup Wizard: the Jump Start Wizard will take care of some default options for you.
For more information about how the Jump Start Wizard handles default options, refer to Salesforce Help at https://help.salesforce.com/articleView?id=approvals_jump_start_defaults.htm&type=5.
For the sake of learning only what we need to know, we’ll skip the Jump Start Wizard and go straight to the Standard Setup Wizard, a more complex wizard that will give you more control over approval configuration:
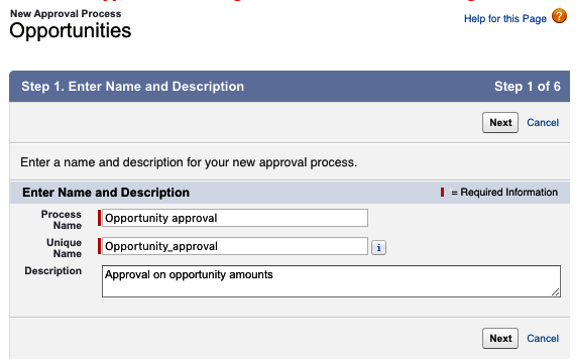
- The first step of the wizard asks for the usual general information for the current approval, something we haven’t seen for other configurations:

New approval wizard, step 1 – defining the approval name
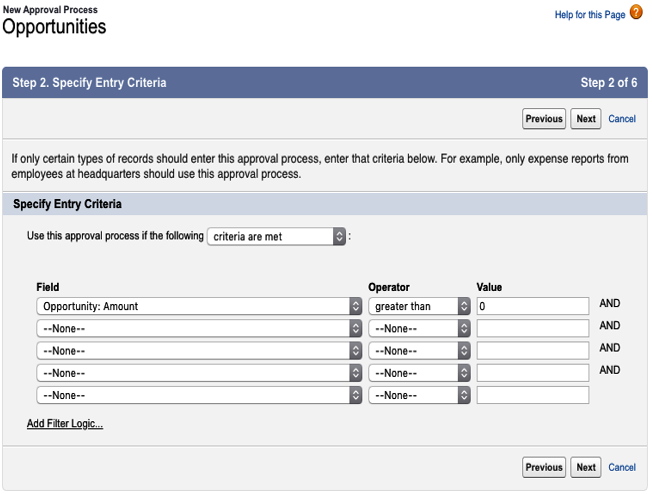
2. Click Next to jump to the following step, which is used to filter down approval records based on criteria or a formula. Our criterion should be that the Opportunity: Amount is greater than 0:

New approval wizard, step 2 – defining the approval criteria
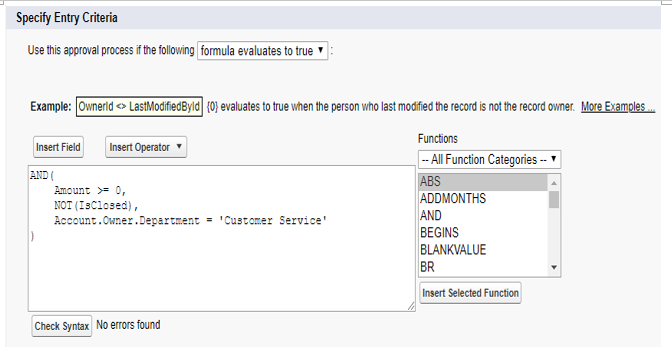
If you want to use formulas instead of a plain criterion, select the formula evaluates to true value on the criteria selection picklist and enter a valid formula criterion as shown in the following screenshot:

Defining an approval criterion using a formula
Formulas are especially useful when your entry criteria cannot be defined with a plain list of conditions, such as in the previous example where we defined a condition based on the opportunity account’s owner, which is not listed in the fields in the criteria are met selection.
3. Go on with the plain criterion definition and click Next to jump to the third step:

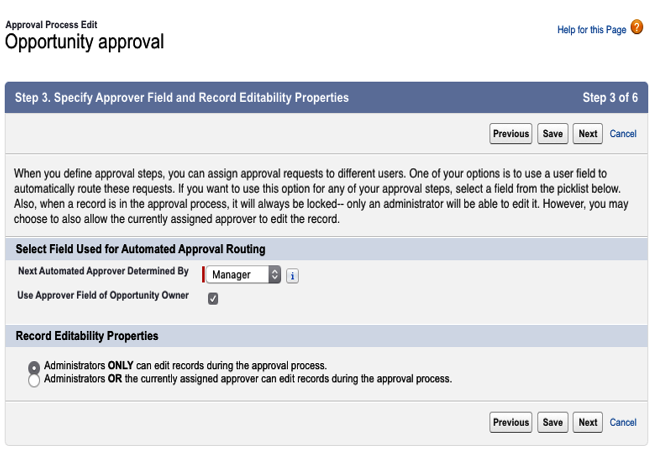
New approval wizard, Step 3 – configuring the manager and record editability
This step is used to select the approving user based on the user’s hierarchy: do you remember the hierarchical relationship fields on the user object that we saw earlier in this book? The user object contains the Manager field (which is a standard hierarchical relationship), but you can create more hierarchical relationships from user to user (for example, Area Manager or Country Manager).
This step allows us to select the user that will be required to handle the approval using the Next Automated Approver Determined By picklist. The Use Approver Field of Opportunity Owner checkbox (the label will change depending on the object you are creating an approval for) takes the kind of approver selected in the previous picklist, selects the approver directly from the current record’s owner (in this example, the opportunity object) if flagged, or from the current user who is submitting the approval if it is not flagged: this means that if you are submitting an opportunity record for approval and this flag is not checked on the approval, the automation will select your direct manager as the approver (your user’s record’s Manager field), whereas if the flag is checked, the manager will be selected from the user record of the opportunity owner.
Another important feature of approvals is the ability to lock a record while it is being approved: this prevents users from updating the records while the approver decision is being taken (we’ll see how to apply this action in the next sections).
The Record Editability Properties section states the following:
- Only administrators can edit the locked record (they must have the Modify All object-level permission or Modify All Data permission)
- Administrators and approvers can edit the locked record.
